29 December 2012

Australian-themed fabric for my first quilt of the year

I bought this fabric when I went to a craft shop last month to buy some interfacing. I did not realize they were on sale and it turned out that this fabric was only about $4.00/metre after a 50% discount more on an already discounted price with a width of 100cms. At the time I bought the fabric I didnt know what to do with it.

We are only 3 days away from a new year 2013 and my weekly creativity is about to end (2 more creations to be posted very soon). I have decided not to do another year of creativity but I will be doing one quilt a month for the next twelve months. It will not be big quilts as I want to be able to finish it within the month. Besides I have no space to store very large quilts. And since I already have so many quilts and quilted wallhangings, I may sell whatever I make to raise funds for my charity...that is if someone would like to purchase my creation. :-)

Here is the first fabric I have chosen for my first quilt for the year 2013. January will be Australian-themed quilt.
My quilts will just be simple, nothing fancy. Sizes will vary between 30cms x 30cms to a lap-sized quilt depending on the design and time I have to make it. I really hope I have the time to complete it in a month.

23 December 2012

i-create Week 49 - My Handmade Christmas Tree

Creativity for the year will not be complete without a handmade Christmas tree and that is what I did for creative life Week 49. The tree which is made of MDF wood was made by my sister. I created the balls to decorate the tree. Here is the tree -
and here are the nine Christmas balls I made and added some glass heart ornaments which I was going to use for a decoupage project. Since I wasnt going to use it yet I added a ribbon so I can hang each heart glass on the tree.
I did balls filled with M&M chocolates, balls filled with a 10 dollar bill note, three balls filled with pompoms in different colors and I also placed a ribbon, a ball with a ribbon embellished with heart brads and I put in a couple of mini fabric roses, a ball with the words 'Believe, Inspire, Create' embellished in a strap which one can actually used as a wrist or fabric bracelet and glass hearts. The balls filled with M&M chocolates and bill notes are Christmas presents for my nieces and nephews. For a change from putting the notes in envelopes, I thought something different for this year and I used the plastic balls and tied a ribbon to close the balls.

I embellished the tree with battery-operated christmas lights and here is the result of the lighted Christmas tree although I think there are too many lights for the small tree. :-)
Hope you like my handmade Christmas tree.

19 December 2012

Creative Life Week 48 - Felt Snowman Bags and Sack

Some of you may be wondering why I am doing all these projects and blogging almost all at the same time. Am I doing all these things in one day? Actually no. I have been making them at least on a weekly basis but just have no time to sit down and blog about it. The past three weeks has been very hectic and now that Dreamers Markets is finished (last weekend) and am on a forced break from work, I finally find the time to catch up.

For week 48 I thought I would make some felt snowman bags. Not sure why I made them because I didnt actually bring them in the market to sell last weekend. The lesser things I brought with me at the market I thought it was better. I only brought the things I had a feeling was going to sell. To think that I spent so much time making the snowman hat and the bags are actually made by hand. Although I only made 6 I did it in two sizes 3 of each.
Here are the small sized bags which measures about 16cms x 23cms -
and the larger sizes which measures about 23cms x 49cms.
By the look at the sizes, these bags are meant for long items but not sure if it will hold if a bottle of wine was placed inside. In addition to the felt bags, I made one snowman sack which measured about 39cms x46cms
A bit late for Christmas as most people would have completed their purchases and wrapping materials but I still would put this in my online shop for next year. :-)

14 November 2012

Creative Life Week 42 - Fabric Headband

I have actually been doing a few projects for my weekly creativity but can not seem to find the time to take pictures of it  so I cant post them yet and I think I am about a month late in posting. For the next few days, I will try to catch up and here is for my creative life week 42. Fabric headbands. I decided to use Christmas fabrics as I already had the feeling that by the time I get to post this project, it would be around Christmas time. A set of mother-daughter Christmas fabric headband. If you cant wear the same dresses then maybe something in the head would be good enough. Unfortunately my model(my niece) is not available so I cant show the headbands being worn.

The headbands are reversible similar to my head scarves and I have put a casing on my elastic. I did not put any interfacing and still they look strong enough to stand on its own because the fabric which is 100% cotton is quite thick. So now I have a choice of wearing either the headband or the head scarf on Christmas day.

Cannot wait for the end of the year when I have completed one year of creativity as I am planning to make an album of all my weekly creations and have them printed.

13 November 2012

I created a Lavender House

I want to make something different to put lavender inside. So this time I designed a house and inside the house is a pack of lavender weighing about 40 grams. I created it in such a way that it would be kind of different from the other fabric houses. The last time I made little fabric houses was when I made 5 of them and sent it to a lady in Japan who wanted to collect 100 handmade little fabric houses for  the survivors of the Great Tohoku Earthquake and Tsunami disaster which devastated much of the coastline and surrounding areas of Northern Japan. Click here to read the article. Of course, my lavender house still has windows and a door and some flowers below the windows. Here is the result of my creativity -
The house measures about 10cms x 12cms. The door to the house is a Christmas fabric with a little button as the doorknob. Am not sure if I had the right choice of fabric for the door but I wanted the house to have something Christmas about it. I hope to make more of this lavender houses to sell using non-Christmas fabrics and have more embellishments.

11 November 2012

I created Christmas headscarves

This weekend, I made more head scarves using Christmas Fabrics and using fabrics for any occasion. The scarves can be worn to protect the head on hot days, or when it is windy and perhaps a bit drizzly. For the Christmas head scarf, it will be great to wear them on Christmas day.

Since I do not have a head mannequin, I convinced my niece to wear the head scarf so I could take pictures. Here she is wearing my Christmas head scarf creation.
Here are some Christmas-themed headscarves -
and Vintage hearts headscarves great for any occasion.
They come in 3 sizes : Small (30cms x 22cms) Medium (45cms x 32cms) and Large (52cms x 38cms). I made 3 sizes just to make sure all head sizes are covered. I hope to make a few of them to sell.


01 November 2012

Making A Difference : Christmas Cards for Dress A Girl Australia

Christmas cards for Dress A Girl Australia is now available for sale after almost a week of late nights designing, creating and printing them. Am not sure why I am not including this in my weekly creative life but I made them to sell so I can raise a little bit of money to help in paying for the cost of sending more dresses overseas especially this Christmas. I consider myself a craftivist. I make things using my crafting skills and sell them to do good in this great world of ours.

The cards come in 4 colors - green, red, blue and multi-color. They are of the standard greeting card size which is 110mm x 155mm. Has a blank inside panel for personal message and comes with a matching white envelope just like any normal greeting card. The only difference is that these cards are purely handmade. The only thing bought is the blank card itself.
Here is a sample of the card -
I have more christmas cards available for sale soon once I have printed them off. To make a purchase, click on the image above or click here.

Click here to know more about Dress A Girl Australia. Thank you.

30 October 2012

Creative Life Week 40 - Christmas Headscarf

Am now into week 40 in my creative life and as predicted sewing will be taking over. A few more weeks and my creative life would be over. Am not going to say at this time whether I would be continuing my creative journey next year.

Well, this time I decided to make a headscarf. I have too many fabric scraps am not really sure what to do with them. A donor for my charity gave me about a dozen headscarves she made and when I saw them I thought they would be a perfect idea for my fabric scraps. Even the small scraps I can patch them together so I can come up with triangles. So here are the scarfs I made tonight. Two of them are made from a vintage fat quarter fabric and the other two are Christmas fabrics. I also have lots of Christmas fabrics some of them I bought about 10 years in the US while holidaying. Here is an image of the scarves I did. They measure about 8" x 16". They are reversible as the fabric I used for the front is the same fabric I used for the back.
I think I would make more of the Christmas headscarf, start a craze of wearing headscarf on Christmas Day made out of Christmas fabrics. I think it would be a great idea to be wearing one especially if it is going to be a very hot day and I think it would be a great way of raising funds. Yes, I think that is what I will do. Watch for these items in my store very soon.

19 September 2012

Creative Life Week 36 - Prayer Doll

For week 36 I decided to make a prayer doll from a pattern I got from another group of Dress A Girl Around the World campaigners in the US. Am not really a doll person that is probably why it took me a while to make one. I have seen lots of them but never really thought of sitting down and making it until I saw this and asked the lady if she had a pattern or instructions to follow that I can use. Here is what I came up with following the instructions provided.
The body is made of twine. The hands have not been properly wrapped by the twine as you can see still see the piece of fabric underneath it. And I think the head is a bit big. Am thinking next time I might use a wooden ball. There is a big ribbon at the back of the dress which you cannot see. 

I always believed in the saying 'practice makes perfect' so the next one (which is in the making) would be almost perfect. :-)

Creative Life Week 35 - Little Foam Bead Boy

A little late again in posting but actually had been quite busy thinking and creating something. What I think makes it more difficult to create  is that I want to make use of the supplies that I already have. And yes I do have a lot so I dont really want to spend anymore just to be creative. 

This little boy is made of coloured foam beads for my creative life week 35. Everytime I see the foam beads I keep telling myself to think of something to make. I always thought of making a doll out of it and so here it is.
 This little guy is about 17cms tall. I used wooden beads for the neck, hands and feet and the head. I saw some doll hair leftovers so I thought I would use it too. Soon I will make the foam beadgirl version of it. I hope you like it.

25 August 2012

Creative Life Week 33 - Lavender Dresses and Car Fresheners

It is dress distribution time again in another 6 weeks for my Dress A Girl Australia charity work and in less than 3 months, it is time for Dress A Girl Australia's Christmas bags so I need to come up with new ideas to make to raise more funds. And this is what I just did for my creative life week 33.

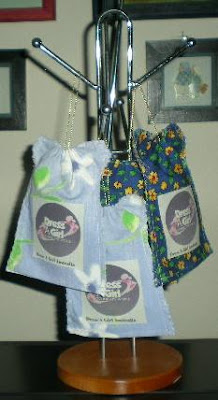
Wrapped in a dress are small lavender bags and car fresheners. Depending on how long the lavender and/or car fresheners would expire, they are easy to replace. All you have to do is remove each item from the dress and replace with new ones.
Dress A Girl Car Freshener
Dress A Girl Lavender Dresses

Dress measures about 11cms x 14cms long. Dress A Girl logo is printed on an inkjet iron-on fabric sheet and I had them ironed-on in the front panel of each dress. 

Dress A Girl Lavender dresses sell at $6.50 each and Car Fresheners sell for $5.00 each. Postage is $0.60 per item and both are available in my online shop.

22 July 2012

Creative Life Week 29 - My Garden of Buttons

I like buttons so it is just natural that I make things using them. For Week #28, I made this garden of buttons. And in addition to that, I found some wooden colourful birds in my junk box and I thought I would use them to embellish my button tree. A few metallic leaves from my brad collection and some wooden beetles completed my imagination of how my garden of buttons should look like.
This small quilt measures about 38cms x 38cms and comes with a quilt label at the back for personal message. Soon to be available in my online gallery.

For more information or general enquiries regarding this quilt or any quilts I have available for sale, please send me an email.

21 July 2012

Creative Life Week 28 - My Fabric Yoyo Art in a canvas

A few weeks back I did a lot of fabric yo-yos but was'nt sure on what to do with them. Well this time I think I have come up with something. In one of the magazines I was reading the past couple of weeks I saw an article of how fabric yoyos were made into an art by attaching them to canvas. I thought that wall art was really unique and beautiful I decided to make one using the fabric yoyos I had.

In one of my trips to a thrift store or a two-dollar shop as we all know, I found a 10" x 10" canvas that came with an easel stand. I decided to buy it even though I didnt know what to do with them but the easel stand was what convinced me to buy. So finally I was able to put it to good use last week.

I wanted the canvas art to have a red background so I painted the whole canvas with red and once it had dried up I started attaching the fabric yoyos one by one using  a glue gun until the whole canvas was covered. I did'nt like the spaces that were left uncovered so I started to make small roses made of felt and covered the spaces with the roses. Same as the fabric yoyos, a glue gun helped me attached the roses to the canvas. So here is the result of my fabric yoyo art, my creative life week #28 and I hope you like it.
Week 28 - Fabric Yoyo Wall Art in an easel stand
I still have lots of fabric yoyos left so watch out for more creations making use of them in the coming weeks and I hope to buy more of these canvas/easel stand if I see it again in the shop. If you can see the easel stand, I think you will understand why I bought it.Both the canvas and the easel stand costs me $4.50. The fabric yoyos were made out of scraps including the felt I used for the roses. So I think this whole fabric art cost me no more than $7.00 with scraps worth $2.50.

14 July 2012

Creative Life Week 27 - More gift cans with leather strap

I do make things regularly on my creative life but just dont have the time to post them here in my blog. This will be the last of my gift can series and then all my supplies will be kept until such time that someone will like any of them and make an order. I put leather straps on coffee cans, big and small round cans and this time on new silver-coloured tins great for storing cookies. These cans can also be great for packaging any presents such as for a birthday, christmas or any special occasions. It is only this time that I have started putting leather-strap handles.

I used to use these tins as my gift packaging for small quilts which I called Quilted Greetings in a tin. The image on the small quilts usually reflect the occasion being celebrated. If the occasion was a birthday the small quilt will have a birthday image or a birthday greeting on it. This time I have attached leather straps for easy carrying which makes it even more great for gift packaging.

I did a decoupage on one of the tins using white polka dots with red background napkins. The leather strap handle is coloured black with two gold brads on each side to hold the strap to the tin. Any of these tins are great to use for packaging birthday cookies or any birthday present, Christmas or to package valentines day presents.
Here is the decoupaged tin with black leather handle -
and here is a sample of a small quilt that I made and think will be great as a Valentines present or any special occasions for someone you care about.
On this particular tin with a cream-coloured leather-strap handle, I printed on a self-adhesive inkjet fabric sheet the word 'Luck' to celebrate St Patrick's Day.
and here is a recommended small greeting quilt that will go nicely with the leather handled tin -
Am starting to make a lot more of this quilted greetings again and will be posting it in my online gallery. They measure about 30cms x 30cms and I could customise the label for you depending on the occasion if you are interested on the leather handled tin for packaging. The small quilt greeting would cost you $39.95 plus 10.00 if you are opting for the tin. I dont make the tins I buy them but the label(s) and the small quilts are all made by hand by me.

To register your interest on these types of handmade gifts, please click here to send me an email or click on the 'contact me' form which you can find on the left sidebar.

22 June 2012

Creative Life Week 25 - Create Cans for any occasion

Since I am into bottles and cans for my creative life the past two weeks, I decided to take out my leftover cans from my old can crafting days and make new cans. I printed can labels for different occasions, run them through my xyron to make them into stickers so I dont have to apply glue to the can and the back of the label. It was nice to use my xyron tool again.

This particular can was a bestseller for me before. The Christmas froggy can. I used to make them in different sizes - gallon, half-a-gallon, pints and milk tins. Now I made a gallon size and a pint size of Christmas froggy. I know it is too early to make cans for Christmas but the mood is there to make them.

By the way, the labels I am using in these cans are actually made of fabric. The label I used in the fabric pouch in a can was printed on a cardstock and I run it through my xyron for lamination.
All you have to do is fill it up with your Christmas goodies and seal it with the cover.
Since I still have lots of cans left, I created a birthday pint can, a love pint can which is great for packaging something special for a love one or to use it for Valentines Day.

What's nice about my cans is that the cover also has a label. I sell the gallon size for 19.95 only and the same price whether it is made of fabric or laminated cardstock. The pint size are $6.95. For milk cans, I sell them for $12.95 each.

If you are interested in any of these cans for packaging, please send me an email. I can customize them for you depending on the occasion you are celebrating. But this is only for a limited time while stocks for the cans last.

21 June 2012

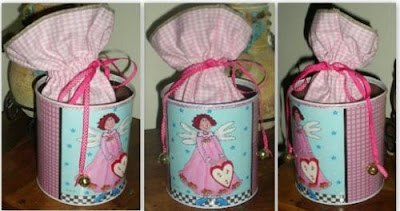
Creative Life Week 24 - Fabric Pouch in a Can

Yehey! The momentum is still there and this time for cans. Well I think they belong to the same category except for the fact that one is breakable and the other is scratchable.

This type of can have no cover and wasnt really sure what to do with it. I was thinking what if I had to fill the can with something to eat like cookies and give it as a gift to someone. Without a cover the cookies will probably become hard as a rock because it is exposed unless they put a foil over the can to cover it. Then the idea came still with cookies in mind. Why dont I make a fabric pouch and adhere the fabric pouch to the bottom of the can. And if they dont want to eat cookies they can just tighten the pouch to preserve its freshness. So here is what I came up with. A fabric pouch in a can. And the reason why I had to attach the fabric pouch to the can is because I wanted the can to be used with the pouch and not just take away the pouch and throw away the can for the beauty of it was on the can with a fabric pouch. It didnt take long to create the fabric pouch.  

I used to create small cans for birthdays and Christmas so I thought I should also embellish the can for this particular creation. And then I stucked a felt heart for a 3D effect and added some bells at the end of the ribbon on both sides. 
I know I enjoyed creating cans before but am not really sure if it became popular here in Australia. I used it to package some of my small quilts. You will see one later on.

So I think I am back to creating cans again. I still have some leftover from my can crafting days. It is time to take them out from the box. 

03 June 2012

i-create Week 22 - Decorated Heart-shaped Bottles

I think am running late now with my weekly project and this could only be explained with either am starting to become lazy or I can't think of anything to create anymore or too busy with other things I have no more time to spare for my creative journey. I think it is more of the later as there are hundreds of things one can do and I dont think I have been lazy because I have accomplished a lot in my other tasks. So just busy!

I am doing a lot of sorting and cleaning-up in my garage so I can start selling some of the unwanted stuff. Actually they are not garbaged items as some of them I am still able to use from time to time and for my creative journey but the reason why I want to sell them is so I can raise enough money to pay for sending parcels to other locations for my community work. While doing some cleaning I found I still had several heart-shaped bottles available and I thought this would be good materials to use for this week.

What I did was I took a small piece of red felt, the thick kind (about 3cms thick) and cut it in a shape of a heart. I then printed the words "you hold the key to my heart" to a piece of fabric embellished with small hearts on the edges and then cut the fabric in a shape of a heart again but this time a little smaller than the size of the felt. I then attached this heart to the felt using a non-acidic double-adhesive tape. Then at the back of the felt heart I attached a garden key (this is what they call them) which looks rusted tied with a ribbon. The key size is about 8cms long. Then I inserted the heart I created with the key at the back inside the heart-shaped bottle. This fitted perfectly inside because I made it a point that the size of the heart is only a bit smaller than the actual heart-shaped bottle. I then created a tag with a red heart in the middle and this I connected to the other end of the ribbon. The opening of the bottle is small so there is no chance of either heart or tag going out or going inside the bottle. Once this was done I then put back the cork that was use to close the opening. The ribbon you see at the neck of the bottle came with the bottle so there was no need to put more decorations outside. I would have put a ribbon if there was none.

For the other heart-shaped bottle with a longer neck, I just tied another garden key with a ribbon, placed it inside the bottle and at the end of the ribbon I tied another tag similar to the tag in the smaller heart-shaped bottle. Instead of putting the heart inside the bottle with the garden key I attached the heart-shaped fabric with the message using a non-acidic double-adhesive tape outside the bottle as you can see from the picture. I did this for variation between the small and the large bottles

So here is my 22nd project of the year - and I hope you like it.


SIze of the long-neck heart-shaped bottle is 11cms x 7cms x 15cms. Size of the normal heart-shaped bottle is 8cms x 19cms x 5cms. 

30 May 2012

My Teddy Bear

This is a teddy bear which I made about 4 years ago when I was doing a lot of fabric memory items to sell. I only wanted a simple teddy bear and one that is easy to make so I designed one and came up with this. I actually prefer a teddy bear over a doll.

The first teddy bear has an appliqued heart and the smaller bear has my nephew's picture instead. Now I remember I made this about two weeks before Valentine's Day. At that time I was also into button-making thus the Valentines button on the bear.
Now I want to revive making these teddy bears. I hope I would have the time to make them again.

If there is anyone interested to order this type of teddy bear, please feel free to send me an email.

26 May 2012

Making a Difference : Dress A Girl Australia

In case you havent known, I actually run the global campaign of dressing girls around the world here in Australia. A global project called Dress A Girl Around the World by Hope-4-Women International whose goal is to make sure that every little girl owns at least one dress especially in the less fortunate locations around the world for each of them deserves to own one.

Last Friday, 25th of March, Dress A Girl Australia was featured in the Style Section of Hobart's Mercury - The Voice of Tasmania. Please click on the image below to read more about the article.
If you want to know more about this campaign. please feel free to send me an email.Would love to  hear from anyone and join us on this campaign.

12 May 2012

Creative Life Week 20 - Image printing on fabric for mini quilts

For this week, wasnt so sure what to create especially that it is mother's day this weekend. The past few nights though I did some image printing on inkjet fabric sheets which I hope to use in mini quilts I plan to make. 

I want to make a quilt that deals with the children being our future and about peace using the images below - .
I also printed some mother's day stickers to celebrate Mother's Day.
In the coming weeks, dont be surprised if I post my quilt creations using any of the above images.

If you want to do your own image printing, check out my wide selection of inkjet printable fabric sheets here . If you have any questions regarding the usage of the fabric sheets, please send an email.

06 May 2012

Creative Life Week 19 - Fabric yoyos and lots of fabric yoyos

This week I did a clean-up of a spare room I use for Dress A Girl Australia. Over time while sewing dresses I was able to collect again a bag of fabric scraps and I really do not like the idea of throwing them away. I know I will be able to think of something to make and use them in the future. So for this week I decided to cut the fabric scraps into circles and create fabric yoyos. And unbelievably I ended up making about 200 pieces of fabric yoyos.

While typing this article I still cant think of what to do with them. I might make a centerpiece out of some or a vase of fabric yoyo flowers quilt or a corsage. Am thinking of selling some of them too.

Am sure this will not be the end of my fabric yoyo making as I still have lots of fabric scraps left not only from making dresses but also from previous projects I had been making using fabrics.


22 April 2012

Creative Life Week 17 - D-I-Y Paperweight

It has been 3 weeks since I last posted.  I couldnt find the time to take pictures of what I have created and blog about it but I have been consistently creating a project to continue my 52 weeks journey on creativity. So am going to backdate my posting so each project still represents the correct week the creation was made. 

For Week 17, I did a paperweight. A round paperweight of handcrafted glass.
I printed my image on a high quality paper. The round paperweight's dimensions are about 65mm and 20mm deep. And the base is made of black velvet.

If you want to create your own paperweight, D-I-Y paperweight kits will be made available in my online store soon.

19 April 2012

[Traveler's Journal] - Defining Images of the Day - 04/2012 - Sydney NSW - "Pots of Gold" in Sydney

Another activity I want to accomplish this year 2012 is photography. Any scenery or object I can capture with my camera on any given day , something that catches my eye. This week was wet but was a good opportunity for "pots of gold". On my way to work from my station's parking lot
on my way to the train station -
and upon arriving at work when I looked out my window -
Such interesting pictures on this particular day with at least three different types of transportation as backgrounds. Was my lucky day.

11 March 2012

i-create - Angel in your pocket Buttons

Been quite busy I am a bit late in blogging and showing what I did for the week after working on the 21-pocket quilt for my niece. It is now week 10 of my creative life and looks like I still am filled with ideas to make. Let me see if I can sustain my brain to keep on coming up with something to make every week especially that this month is craft month. For this week I decided to make buttons for the children of Roma Qld. A lady member of the facebook group The Sewing Library posted a message on the group's page about children of Roma who with their family lost their homes and everything in them in a flood that inundated Queensland several months ago and she thought it would be a great idea to get some members of the group to make some handmade things for the kids. 

Am not so sure how the kids would react to what I was going to make but the moment I saw the message posted I was determined to make buttons and I was going to adhere ribbons to the buttons so they can wear it if they want to. I started to find the right image to use for the buttons and I came up with the image of an angel inside a pocket and a message which read 'an angel in your pocket they say...will keep your troubles far away...'. I used a 57mm size button which I have plenty in stock.

Here is the button I created with a ribbon and to finish off the handmade item I placed them in organza bags which I bought from a 2-dollar shop near where I live. 
I hope the children of Roma will like what I made for them.

If you want buttons to be made with your own designs, please click here for enquiries. Buttons can be made in different sizes (25mm, 32mm, 57mm and 77mm) and can be made into the regular buttons, magnetic buttons, keychains or mirror buttons. Mirror buttons only come in 57mm size. 


04 March 2012

i-create Week 9 - Completed Quilt

I finally completed my 21 pocket quilted wallhanging with the 21 messages inside the pockets from family and friends. I had to finish it as it had to be given to the celebrant last night. I typed each message on a white cardstock. Each message has to fit in a slightly smaller size than the pocket (6cms x 8cms) then cut each of them to create tags and finished the tags with ribbons. On each pocket I randomly distributed the numbers 1 to 21.

Here is the final 21 pocket quilted wallhanging.


If you want to know more about printing your own images, please send an email or click on the 'contact me' tab found on the left navigation pane.

27 February 2012

i-create Week 9 - Pocket Quilt

This last week I was busy finishing a pocket quilt for my niece who is celebrating her 21st birthday this weekend. The idea of the pockets in the quilt, all 21 of them is to gather 21 things about her from friends and family. Each pocket will hold a description of her or anything you can say about her. 

It was quite tricky to put them together as 21 is not really an even number. Whichever way or direction I go for the 21 pockets I always ended up with one extra until finally I decided to put the 3 pockets below her printed images.

The images at the center of the quilt is printed on a 13" x 19" 100% cotton poplin inkjet fabric sheet. The block measures 30.5cms x 41.5cms. The 21 pockets measures 6.5cms x 8.5cms. The whole quilt measures 56cms x 65cms.
I now have 5 nights to go to finish the quilt and print the 21 messages I need to put inside the pockets. When this is done, I will take another picture and post it on this site.

Please send me an email or click on the 'contact me' option on the left navigation pane if you want to know more about printing images on fabrics or making your own fabrics.

For more information on inkjet fabric sheets or to purchase inkjet fabric sheets, visit my gallery.