20 February 2012

Creative Life Week 8 - Create your own fabric prints

Unlike other artists where they focus on a single theme in their creativity, I do not have a theme to focus on. I just create anything I like to create. A  free crafter and do anything that I would enjoy making.

For this week, I created my own fabric prints using my old inkjet printer and specially treated inkjet fabric sheets and created 4 projects. Am unstoppable when am doing my own printing. I started making my own fabric prints about 8 years ago and concentrated only on memory quilts, pillows and family trees. I enjoy making items that shows pictures of real people.

First on the list are fabric bookmarks. Measuring 7.5cms x 18.5cms I printed pictures of my niece and nephew,  their names and a small message on each bookmark which characterizes each person.  My nephew is an avid reader (once joined a competition on being able to read 10 books in a month) so the message I printed on his bookmark is 'Please help me stop'. My niece is the exact opposite that sometimes we tease her if she would be able to finish reading the book in a year's time so the message I printed is 'This is where I fell asleep'. To highlight the images, names and messages I drew squares using running stitches and finished off the bookmarks with ribbons.

Front Panel Bookmarks
Back Panel Bookmarks
Second project on the list are Fabric mini memory pillow keychains. Fabric keychains measures 11cms x 8cms. Pictures and back panel prints are  printed on specially treated inkjet fabric sheets. One of the mini pillows is finished off with a blanket stitch by hand using a black thread.


Third project on the list is a memory heart pillow. Measures 15cms x 15cms(widest and highest points of the heart) On each side of the heart I printed pictures of my 2 nephews and finished off the heart with a ribbon for easy hanging on the wall.

Last on the list is a memory family tree pillow. Measures 35cms x 26cms, I printed an image of a family tree on a specially treated inkjet fabric sheet and made it into a huggable family tree pillow. The family tree includes the name of that special little boy or girl in your life, parents, grandparents, great grandparents on both the maternal and paternal sides which you write on the boxes provided. The picture of the little boy or girl can also be added below the name.

My gallery specializes in memory items made of fabric. I also accept custom-orders on any memory products including printing of images on fabrics. Click here for more information.

If you prefer to do your own printing and creation of any memory items, specially treated inkjet fabric sheets are also available for purchase in my gallery under Inkjet Printables

15 February 2012

Making A Difference : Creative Life - Little Fabric Houses

I wasnt so sure if I wanted to be creative this week as I wanted to have a rest from the past 3 weeks of serious creations. I thought that if I created something for this week I will have to use the fabric scraps I have been collecting over the years and increasing in quantity since I started making dresses for my self-funded charity work Dress A Girl Australia. Every bedroom door I have in my house you will find plastic bags full of scraps hanging on the doorknob. Am not only a fabric hoarder but a fabric scrap hoarder too.

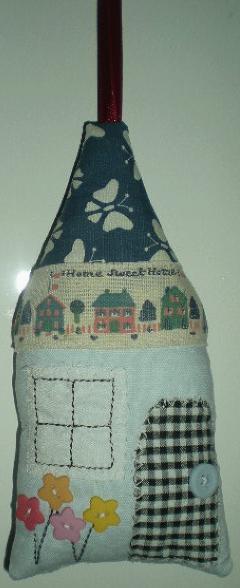
Then while reading blogs I follow on the train on my way to work I found this blog of a lady living in Japan who wanted to collect 100 handmade little fabric houses for the survivors of the Great Tohoku Earthquake and Tsunami disaster which devastated much of the coastline and surrounding areas of Northern Japan. She wanted to collect 100 handmade little houses with messages so she can share them with the people in the community. I thought it was such a nice gesture and a good way to put my fabric scraps into good use. I also thought the little houses made from her pattern were so cute I needed to make one myself.

Here are the five houses I made since Friday night. I was thinking of making only one house to send but after completing the little house, I decided to make another one until I ended up with 5 little houses. It was so much fun making them that I am going to make one more for my collection.

At the back of each of these little fabric houses, I attached the message below which I printed on a fabric sheet - 
ippo ippo minna no sutekina mirai e (step by step for a wonderful future)

I was in a hurry to pack these little houses so I could send it today that I forgot to take a picture of the back of the house.


To know more about the little houses project, click here. But hurry if you want to donate as the deadline for all houses is on the 21st of Feb. Or copy and paste the URL below in your internet browser.
http://jojoebi.blogspot.com.au/2012/02/little-houses-project.html

I hope these little houses will give hope to the japanese survivors of the tragedy which is turning one year next month.

05 February 2012

Creative Life Week 6 - Final Invites

After 3 weeks I finally finished my niece's final invite for her 21st birthday and completely embellished. The last item to do was find small pieces of magnets to put at the back section of the invite so it can be decorated on a fridge. Instead of buying them, I decided to recyle the magnetic calendars and/or business cards you usually get for free on postboxes which I had quite a few. I cut them into pieces and glued them onto the back. 
Pre-final invites
Recycled Magnets

Final invites complete with  rose corsages and ribbons
The invites are now ready to go!!
For those who are interested to purchase blank gown-shaped cards for their special girl's special day, these are now available in my gallery to purchase. Click on any of the images above or click hereFor general enquiries on the blank cards, please send me a message.

30 January 2012

Creative Life Week 5 - 2012 CD Calendars

I started making this project in early December and didnt have enough time to finish it. I could only make 2 months out of the 12 months of 2012 and decided to stop making it. My intention was to make them so I could sell them.

Two weeks ago I started to work on it again until I finally was able to complete the whole year but only for 1 set. Since I already had completed the templates, it was now easy to print additional sets. 

So this week I again decided to make more CD calendars and in 2 sizes. I was able to print 6 sets for the large calendar (4.75 x 5.5) and 4 sets of the smaller size (3.50 x 3.75). Both sizes are in inches. The monthly images from January to December are pictures of Dress A Girl Around the World distribution of dresses to the less fortunate children around the world. I printed more so I could send them to my friends, show off my latest creation of a CD calendar.

Below are the monthly templates for the small-sized calendars -

To see the complete 2012 CD Calendar set, click here.

23 January 2012

Creative Life Week 4 - New Project - Kindle Cover

I am still doing the invites for my niece but once you have decided on the card design, finalized what information you need to print and decided on what pictures to include on the invite, the next few steps tend to become boring. There is not much challenge when you have done the printing and start cutting especially after you have done it about a dozen times. Making about 45 of them starts to become so routine that I decided to squeeze in a new project.

This time I thought I would make something for myself so I made a kindle cover for my kindle. It wasnt really difficult to make since I only wanted a simple one, as long as my kindle gets protected from the car and house keys, wallets, pen and other things I have inside my bag. The longest task to finish was looking for a spare velcro from among my piles of craft supplies so I can close the cover when am not using it. Just when you need one you cannot find it. 

Being a fabric hoarder had an advantage again as there was no need to go and buy the fabric material. I have several metres of fabrics that are already padded and quilted so this saved me a lot of time but I would have wanted to use one with perhaps alphabets or books printed on it if I had one. I finally opted for the fabric with a 'travel' theme. Perhaps it will go well when am travelling with my kindle or taking the train to work with my kindle. :-)

Here is the kindle cover I made with my kindle on it. 

I hope you will like it. Or inspire you to make one if you have a kindle.

16 January 2012

Creative Life Week 3 - First project – my niece 21st birthday in early March.

My first project is now underway and I reckon this project will take me about 4-5 weeks in the making or until the birthday party actually happens. Am not sure if I would be able to create new projects every week, if time would allow me to make small things in between within these 4-5 weeks timeframe but will see how it goes. I might be able to squeeze in a tag or 2 and be able to promote some of the supplies I sell. J

The tasks within this project would be (1) to create 45 invites with matching envelopes (2) create a small quilted wallhanging which will hold personal messages for my niece from her friends and family. These messages she will then open and read at her party. (3) make a special gift box for invited guests to drop their envelope presents. The idea of the box is so small presents are kept in one place only. Their might be a 4th task which is to create paper buntings to adorn her marquee. A marquee will be setup as the party is going to be held only at their place of residence. They have this big wide lawn which is good enough to accommodate her guests.

For the invites, I have come up with a gown-shaped card which opens up for the details of the event. The gown would be coloured white with a pink ribbon belt and a pink single rose to be adorned on the shoulder. Although her color theme is pink, she decided to have a white gown and instead use the color pink only as an embellishment of the gown.

The size of this invite is about 17cms in height and about 8cms wide (widest point of the lower section of the gown). The card below is a prototype of the invite.

The printing of the details of the event in the inside panel of the gown-shaped card is a bit tricky but can only figure out how to do the printing when the details of the event are finalized plus I might throw in a couple of pictures of the birthday celebrant.

So there you go. My first project of ‘my creative journey – week 3’.

The saga will continue.